Showing posts with label How To?. Show all posts

March 15, 2009

How To: Format PenDrive With NTFS File System

PhotobucketWell, maybe some of us ever wonder wonder how to format any pendrive with NTFS file system. As with me, i also wonder about it. So, I opened my Opera browser and search for any ways to do it. And yes, i found the way! clapping
NTFS allows you encrypting your data which is a feature that is inbuilt in Windows XP and above. It also lets you to add allow and deny permissions on individual files and folders for specific Windows users, something you can’t think of using FAT file systems.

So, lets move on to how to do it. I've insert some pictures here to help you to understand it better.

Plug in your pendrive. Then, right-click at your My Computer and choose Manage
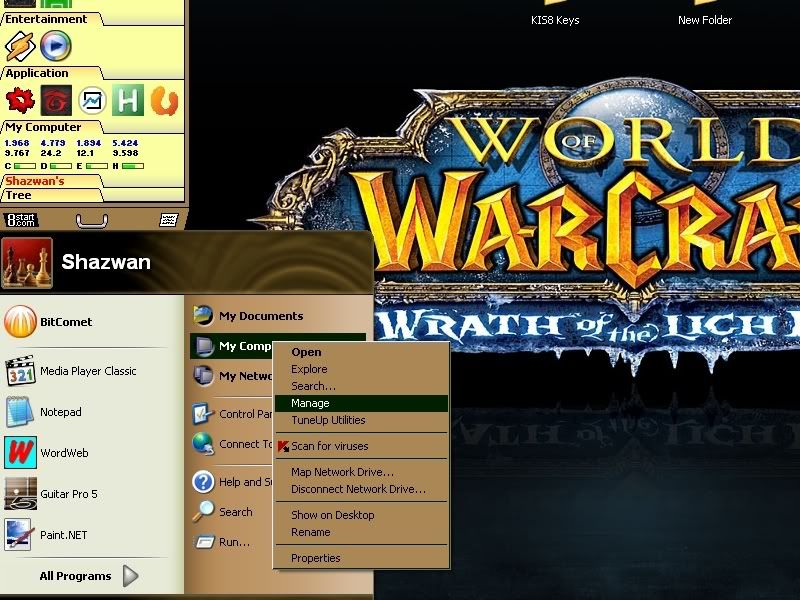
NTFS 1


Click at Device Manager. Then select Disk Drives and select your USB pendrive.
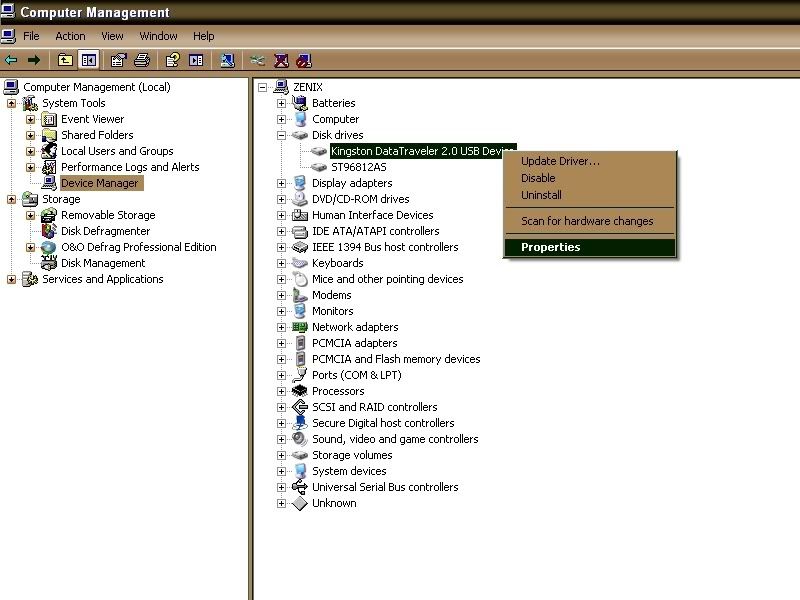
NTFS


Properties for your pendrive will be open after that. Click at Policies tab and choose Optimize for Performance. Click OK after that.
NTFS 3


Now, go to your My Computer. Right click on your USB pendrive and try to format it. AT File System menu, drag down it and you will see the option NTFS is there!
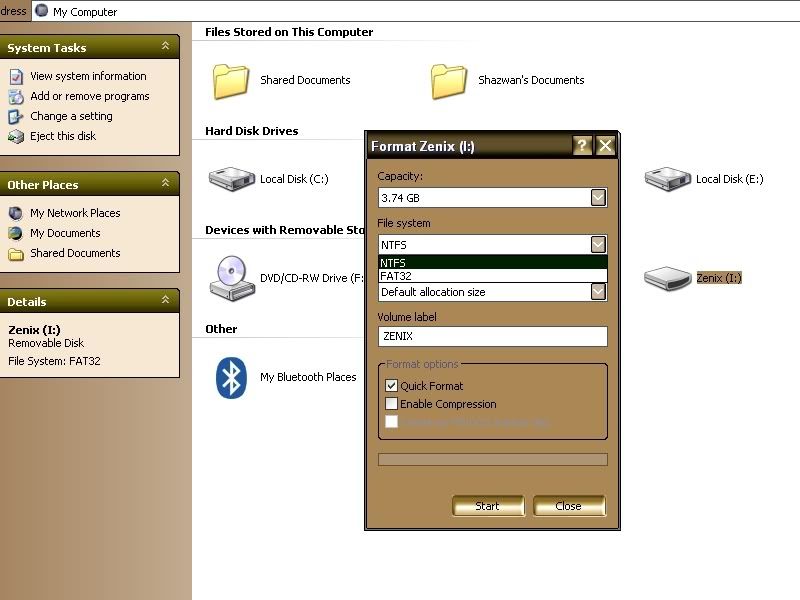
NTFS 4


Well done!clapping Your pendrive now is in NTFS file format, you can either compress the data in it or can encrypt the data.

February 19, 2009

Backup Your Gmail Account

Gmail logo It's been a five years since i registered and using my Gmail account.But only now I knew how to backup those bunch of email in my account. 

This ia a free utility that will backup your Gmail account completely.
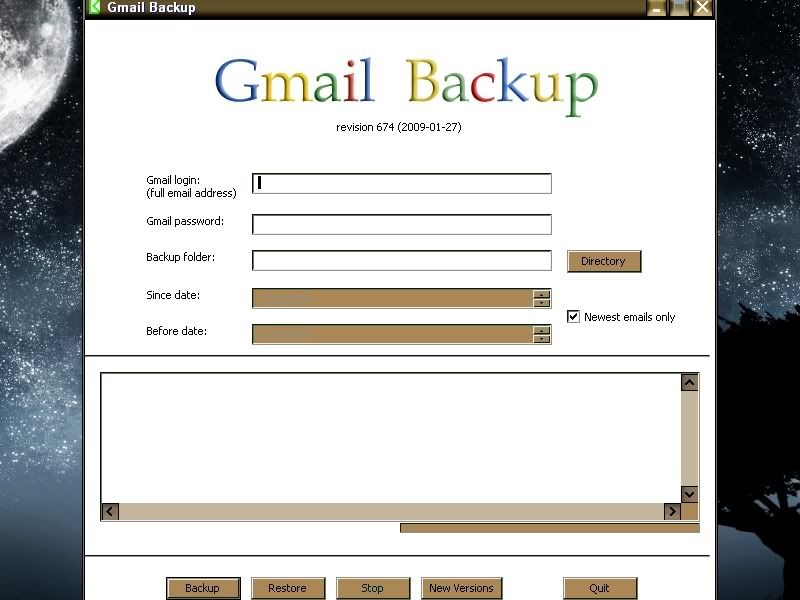
GMail Backup is a free utility (I love the word FREE!) that can restore or backup your Gmail account. The backup is stored in standard eml format, which means you can open your messages using Outlook express.


gmail backup

Enter your login information.
Choose where you want to put your backup emails.
Click on the backup button.
You can view your messages by double click on it and it will open in Outlook Express.


Download: GMail Backup

February 12, 2009

Download Flickr Photos with Flickr Original

This Firefox add-ons will let you to download full-sized photos from Flickr.

Enter Flickr Original.
Please take note that this add-on is an experimental mode. It basically provides the means to download Flickr images by right-clicking on a thumbnail. If you visit Flickr you notice that thumbnails are located on the first page that you visit if you perform a search or browse images.

Install the add-on. You need to restart your Firefox browser. Do it and go to the Flick website.

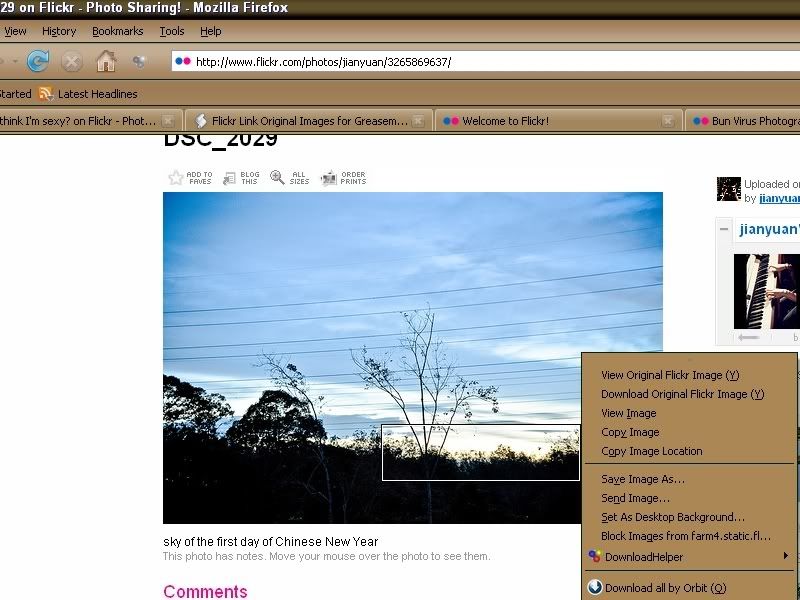
All that you need to do is right-click on any image and select Download Original Flickr Image option in the context menu. A download dialog will appeared so you can choose the download location.

flickr original


Another function for this add-on is to view the full sized image immediately on Flickr. Anyhow, the add-on is not working on all Flickr images. Images with disabled downloads and the flag ”all rights reserved” cannot be download this way. A error message will appear telling the user that the image is not available for download.

January 31, 2009

How To Map Hack in DotA

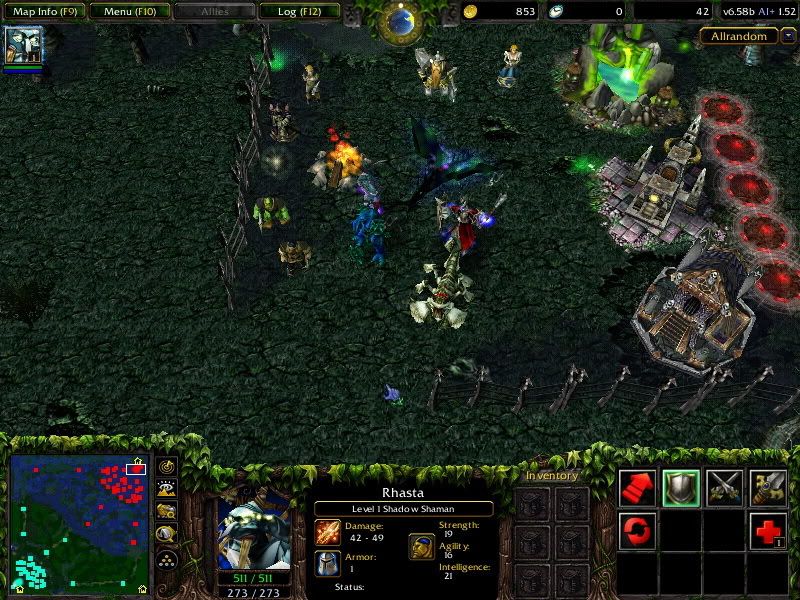
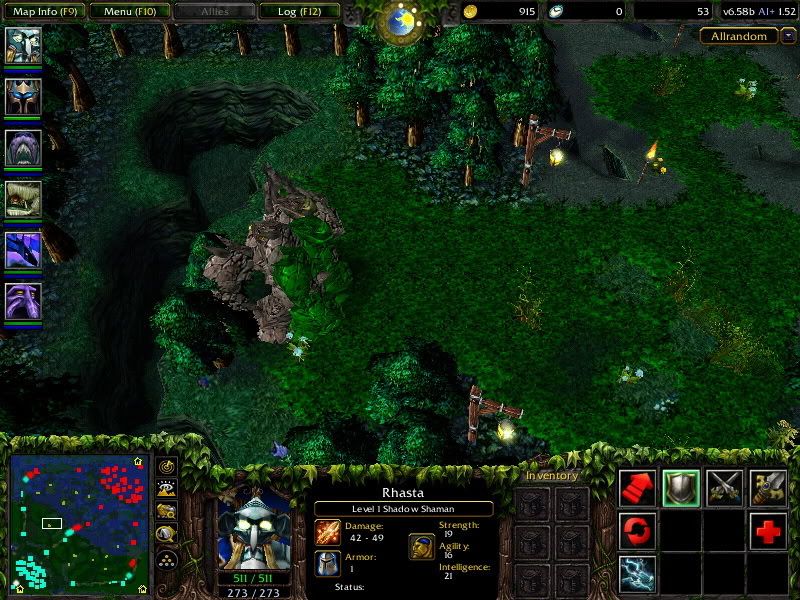
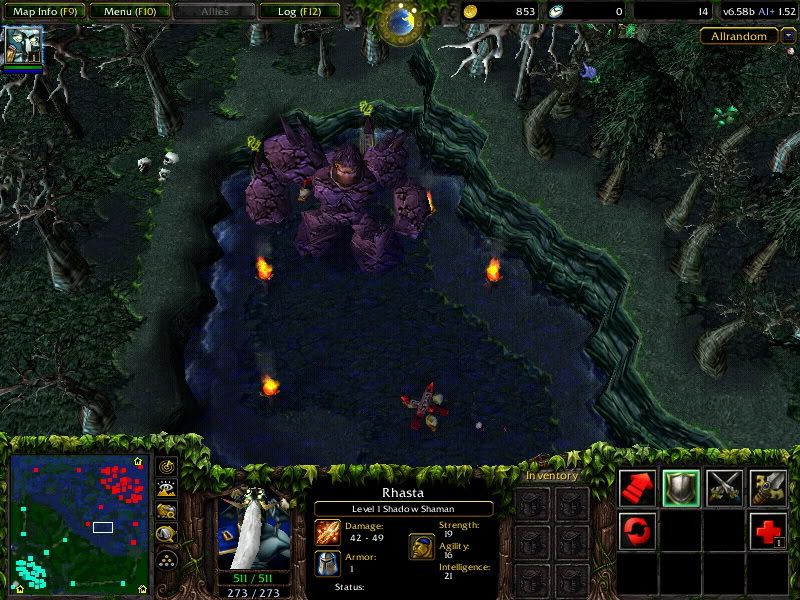
In this post, I will show you how to do a maphack in DotA.

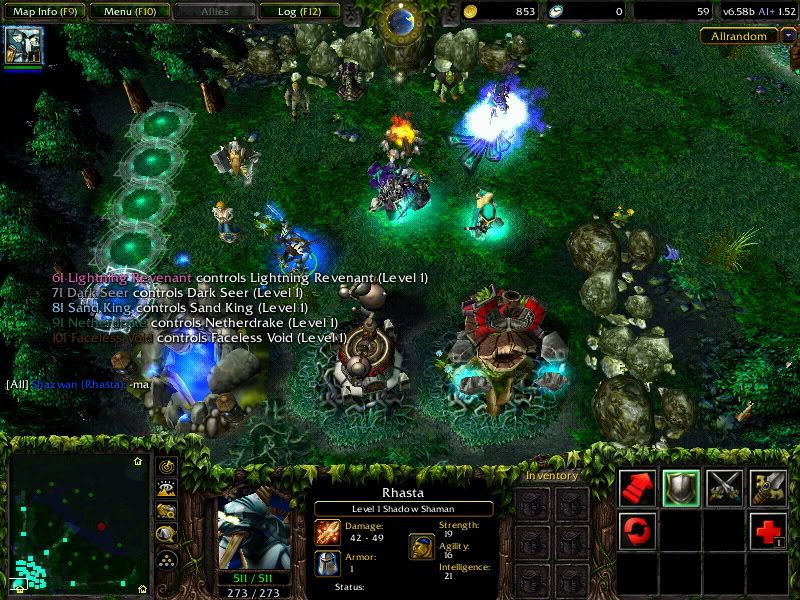
This was taken before maphack turned on.

maphack 4

maphack 1


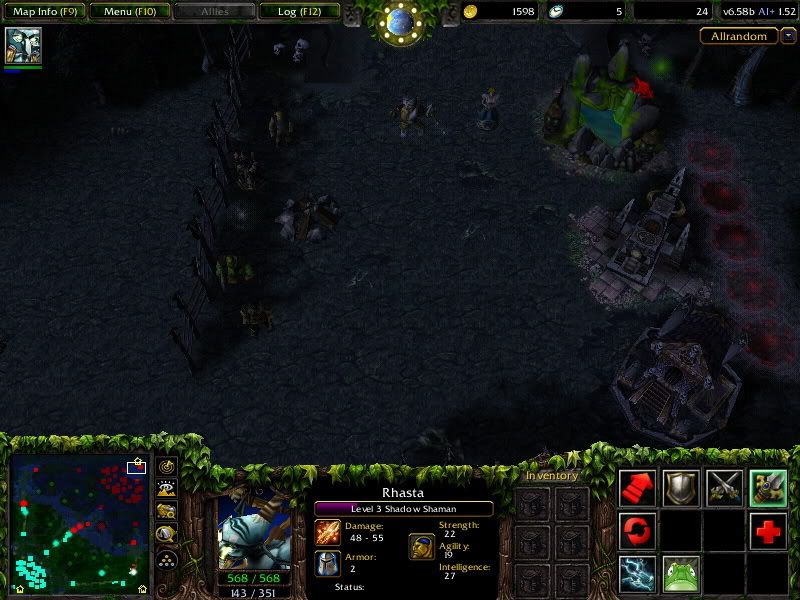
These taken after I turned on the maphack.

maphack 3

maphack 6

maphack 7


First step is, download this maphack program by ShadowFrench here.
I'm using version 1.21.B5 for this tutorial.
And yes, if you using Kaspersky Antivirus, you need to turn it off before download this program as Kaspersky detected it as a trojan.

Run your Warcraft 3. Check what version of your Warcraft. I'm using version 1.21 in this tutorial.
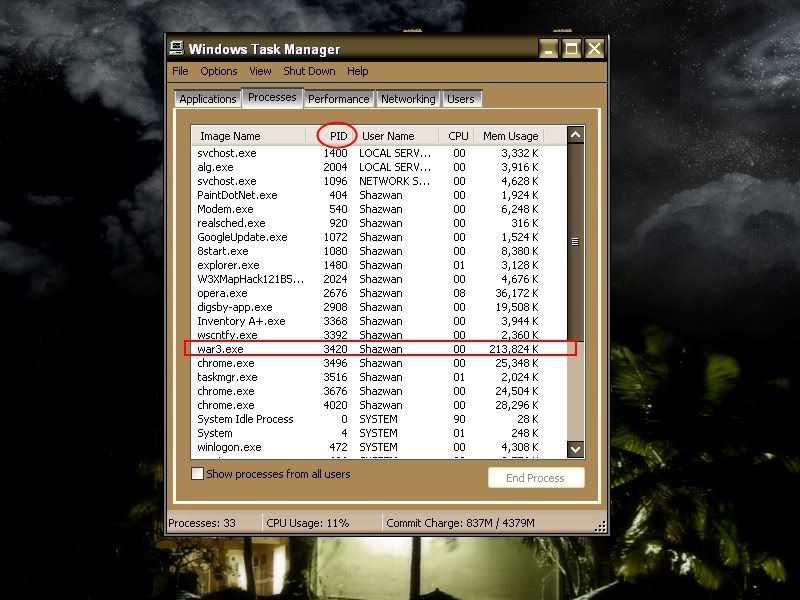
Then, you need to open your task manager and check what PID number your Warcraft using. Do not close your Warcraft as the PID number will change everytime you close and open it.

maphack 2


Open your maphack program.

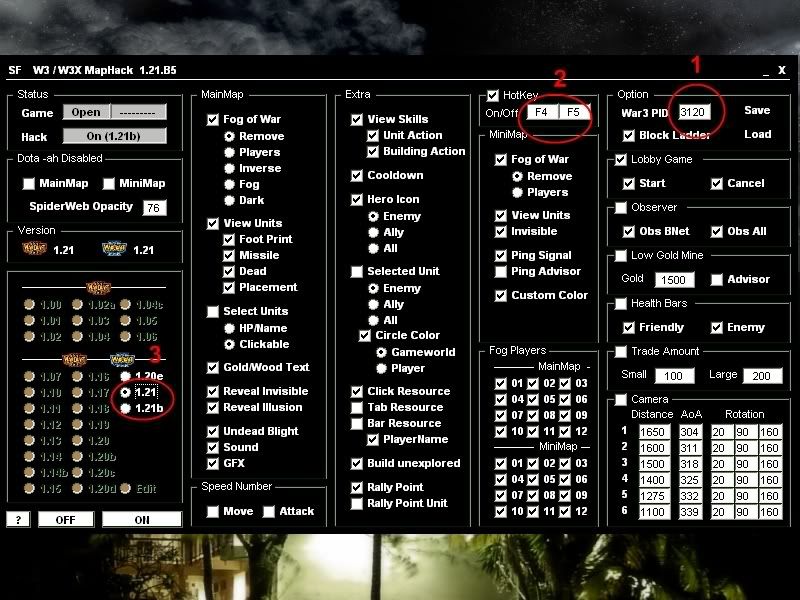
maphack


1) Enter your Warcraft's PID number like in the picture above.
2) Choose your hotkey to turn your maphack while playing. (Hotkey in the screenshot is the default one)
3) Choose your Warcraf's version.

DONE!

Join any game and when the game started, press your hotkey to turn on the maphack.

Note: Use it at your own risk!

January 27, 2009

Check if Your Computer Can Run a Specific Game

How to check if you computer can run a specific game?
Puzzled if your computer can run a game smoothly?
Plus with newest generation game that required higher game specification.
Well, you can check it here.

System Requirements Lab is a simple tool designed to help you check your computer’s hardware and detect whether it meets the official minimum and recommended requirements of a PC game. It requires the installation of a quick Java applet (SRLApplet from Husdawg, LLC)

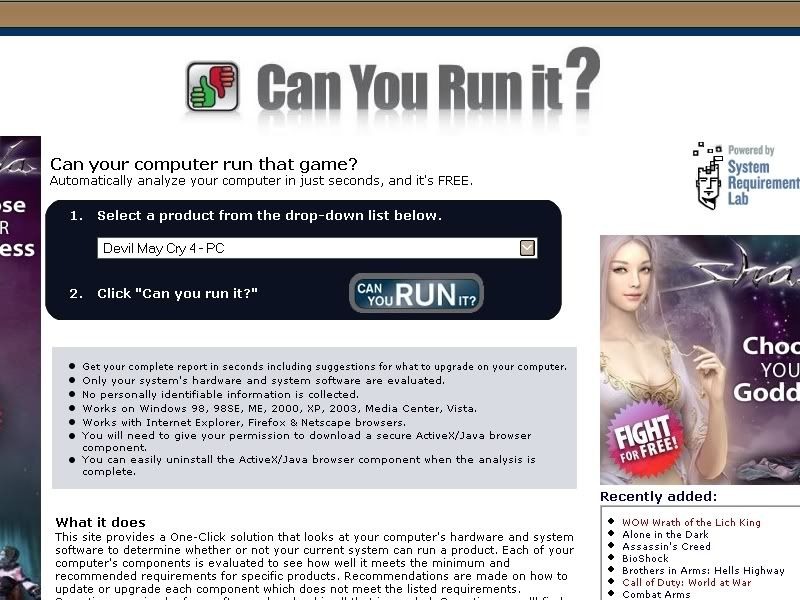
I have made a test with this website (wondering whether my lappy can run newest game or not laugh)

check 2

^I've choose to run a test with Devil May Cry 4.^

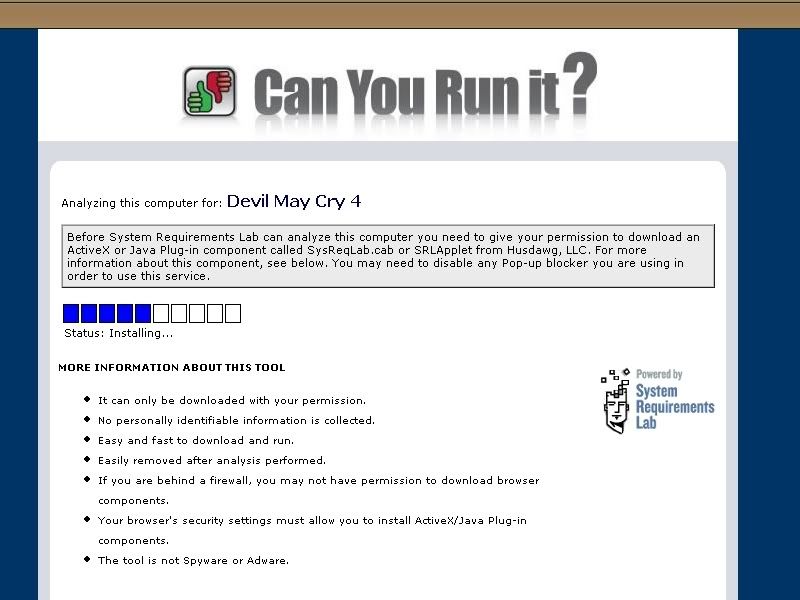
check 3

A loading bar will appeared, and it’ll ask you to install the applet. Let the applet install, and your results should appear shortly.

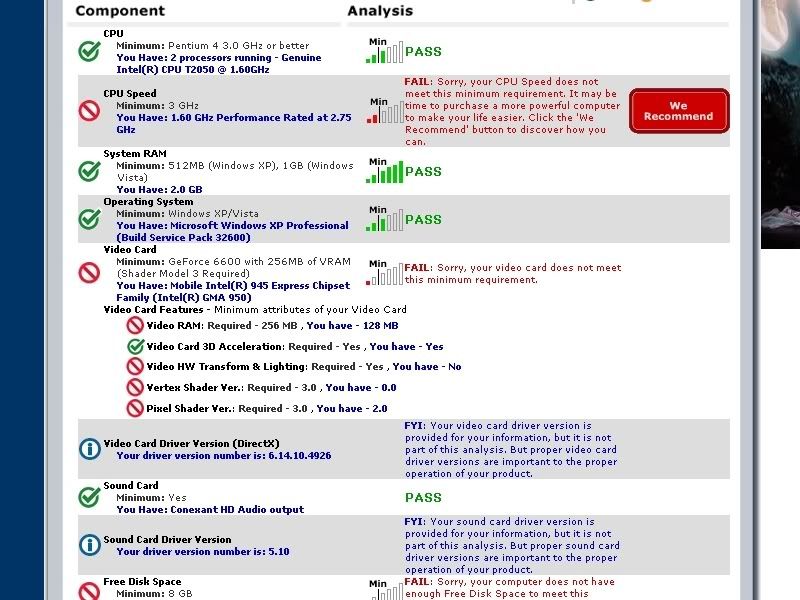
And the result is? Photobucket

check 4

I've failed! sad....

check 5

This is the list of the required PC specifications, and then your PC specifications with a rating bar relative to the requires specifications. It’ll also list any “helpful” information, including links to free driver updates, and if your hardware does not meet the requirements, a link to their recommendations (which uses a page from the store TigerDirect).


This site is useful when you want to buy a DVD games or download it from internet. Have your PC check here before download or buy a DVD games.

Lucky I'm not so addicted to games. Have a pleasant day everyone!

January 15, 2009

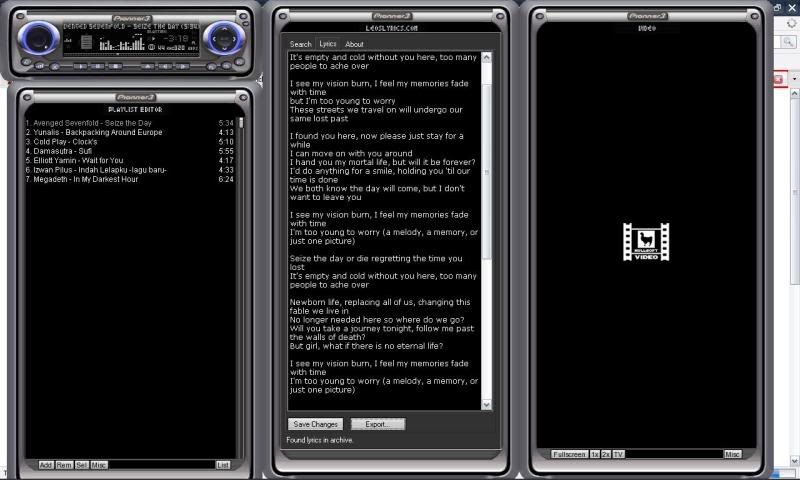
Automatically Display Lyrics In Winamp

Leolyrics Winamp Plugins (Leo's Lyrics Plugins) let you to automatically display lyrics in Winamp when Winamp play any media files. When you play something on Winamp, Leo's Lyrics Plugins will automatically search Leolyrics.com huge lyrics database that exactly match the song name and artist. Downloaded lyrics then will be saved in achieve so the plugin won't need to re-download the lyrics everytime a same song is played.

Photobucket

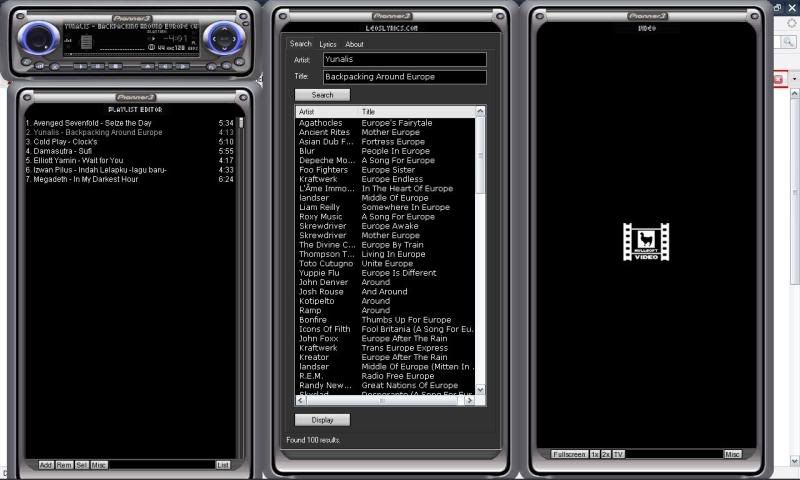
leo plugin 1


And everytime this plugin cannot find the exact match for played song, a list will display and you have to manually choose the lyric from there.

I reckon that this plugin is a must-install plugin for Winamp!

Download : Leolyrics Winamp Plugins

January 11, 2009

How To : Block Ads in Google Chrome

Quick and short tip for this post.
How to block ads in Google Chrome?
1.) Install Privoxy
2) Click on the Wrench icon in Chrome in the upper right corner
3.) Choose options>Under The Hood>Change proxy settings
4.) A windows box pops up, choose LAN settings (at least this is what it's called in Vista)
5.) Check off "Proxy settings" and in the address setting add127.0.0.1 and in the port 8118
6.) If you have the option, you can also check off "Bypass proxy for local settings"
7.) Click "Ok", close chrome and restart it.

January 5, 2009

Download And Play Offline Game

Addicted to any offline games? Ever thinking oon how to play it without using Internet? Ever thinking on ow to download it?
Well, now you can download it with ease! hyper
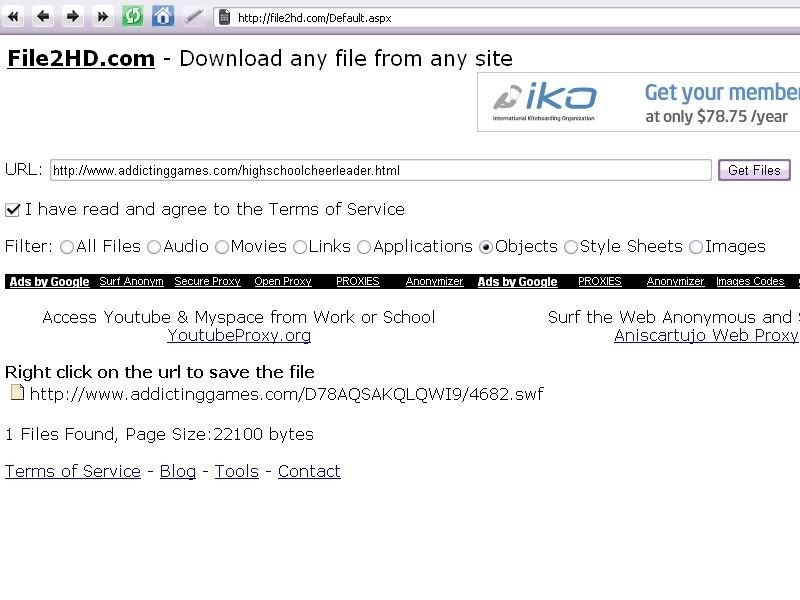
Ok! Let's get start. First, go to this site, File2HD. This site will let you download flash games from most of the flash gaming site.

1. What you need to do is, go to the page with the flash game that you want to download.
2. Copy the page URL and paste it into File2HD.
3. Set ‘Filter’ to ‘Objects’ and click on ‘Get Files’ button.
4. Next, File2HD should retrieve the direct link to the game file.

flash offline 1

5. Right click and download that game to your computer.

We're done at the first step. Now we're into the second step.

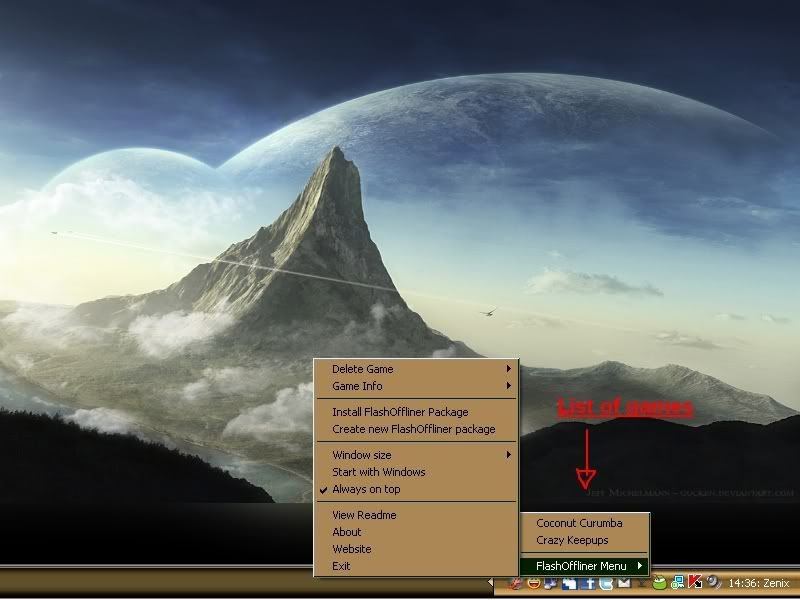
1. We need this so-called FlashOffliner in order to run those games we have downloaded.
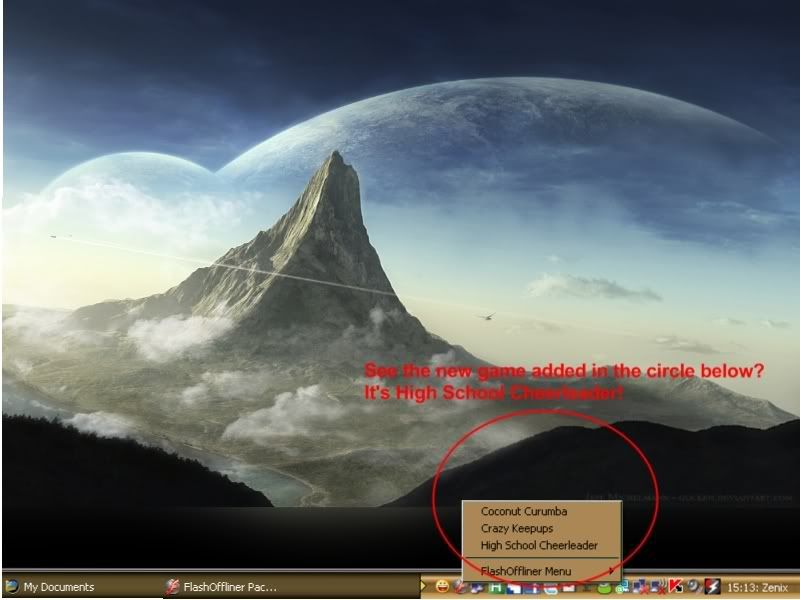
2. Install dan run it. Notice that there's a icon in the taskbar. Right-click it.

flash offline 2>
You should see the available games to play and it comes with the installation files that you just downloaded.


3. Now, how to add the games that you downloaded from websites? Right-click the FlashOffliner icon and choose ‘Create New Flash Offliner Package’ and then point it to the downloaded file. Start packing it.

flass offliner 5

4. Again right click on the FlashOffliner icon and select the ‘Install FlashOffliner Option’. Point it to where you have saved your file in step 3 above. This will install the game and added to your FlashOffliner games.

flass offline 3

flash offline 4
That's it! hyper

You can easily resize it to 400×300, 640×480, 1024×768 or Full Screen.

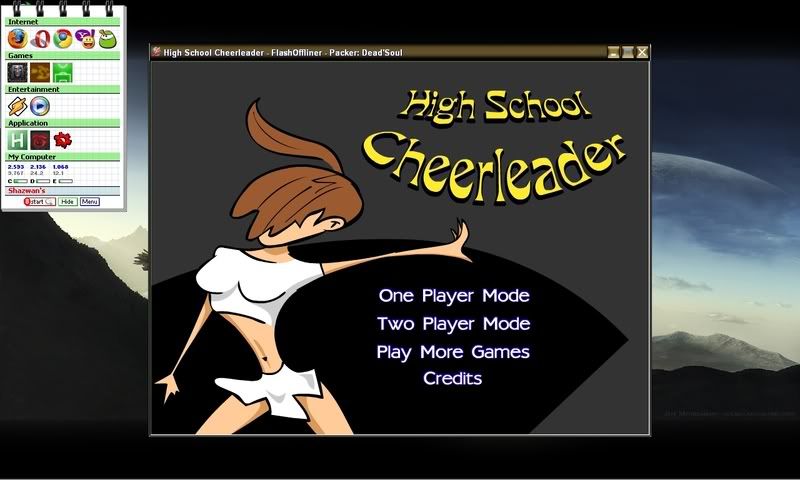
Oh ya, not to forget, I have download the game "High School Cheerleader" here, Addictive Games. It's a huge site for flash games and there's so many games you can choose yourself.

January 2, 2009

Backup And Restore Internet Explorer Settings

Not long ago, i have written about how to backup your Mozilla Firefox setting. Check my post if you are Firefox users.
This post also on how to backup, but in different browser. And it's Internet Explorer.
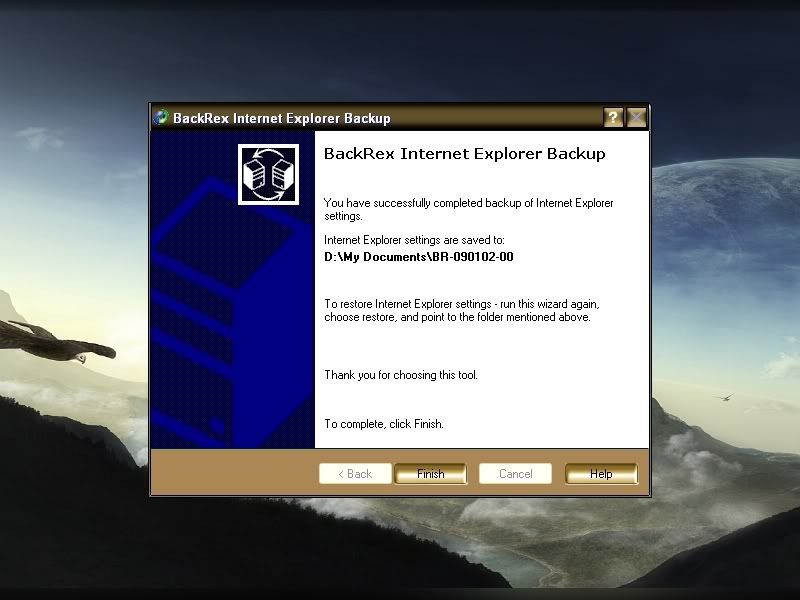
Download this small utility named BackRex Internet Explorer Backup here.
It can backup and restore settings for Internet Explorer. It allows you to backup :
1) Favorites
2) Proxy & connection settings
3) Security zones
4) User customizations
5) Cookies
6) History
7) Dialup accounts
8) Form Autocomplete entries

It's works on Internet Explorer versions 4.0, 5.0x, 5.5, 6.0, and 7.0.

Some screenshot:

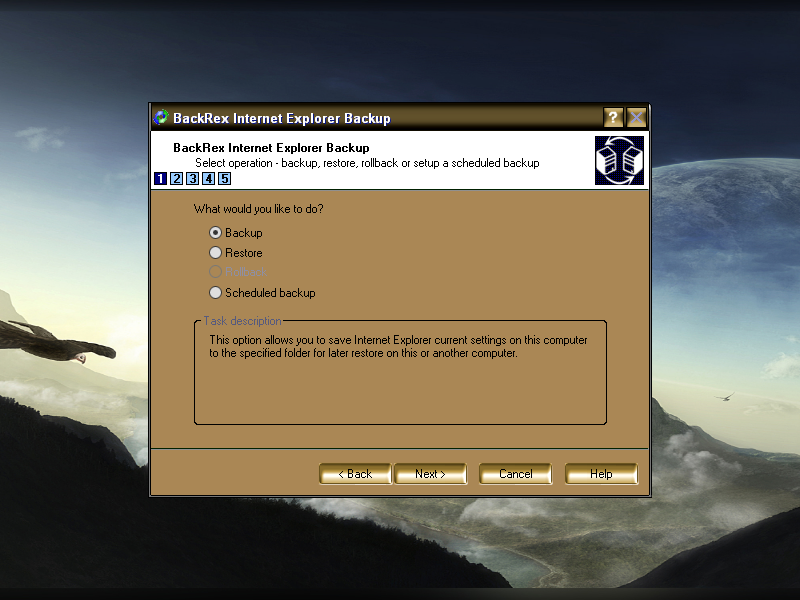
ie backup 1
Choose whether to backup or restore your IE setting


ie backup 2
Choose where to save your settings. Put your password if you want to.


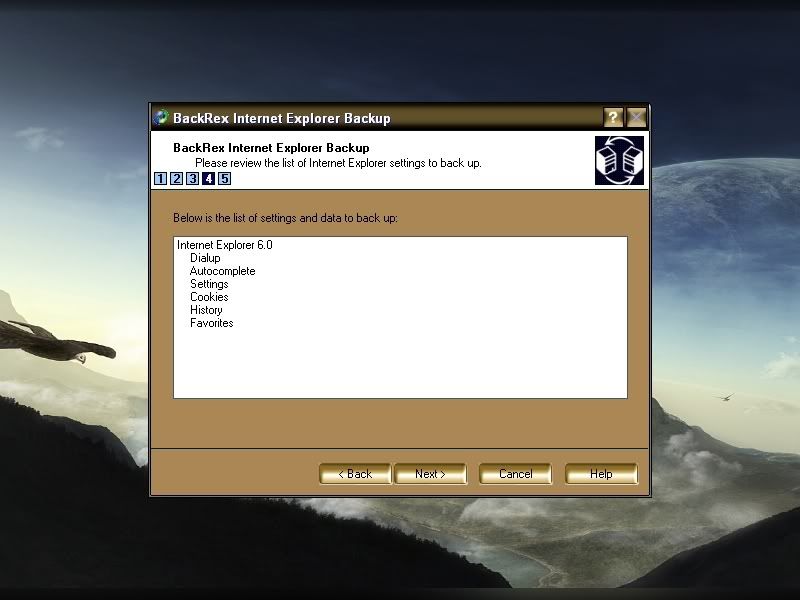
ie backup 1
List of settings that will be backup.


ie backup 3
Done!


If you planning to migrate from IE6 to IE7, you can backup your IE6 settings and restore it on IE7.
And remember to backup it it frequently with the "Schedule Backup" option. Have a nice surfing with Internet Explorer! smiling...

December 26, 2008

How To Add A Simple Search To Your Blog

First of all, this only for those who using Blogger only.
For me, every blog should have a "Search" feature. This will make your posts reachable and make your reader happy for this feature.
Below are the simple instruction on how to add this feature to your blog.

1. Log into your Blogger.com account.

2. Click the Layout tab from your blog Dashboard.

3. Click Page Elements.

4. Click Add a Gadget above the section you want to put your search box in.

5. Find and click the plus sign next to HTML/Javascript.

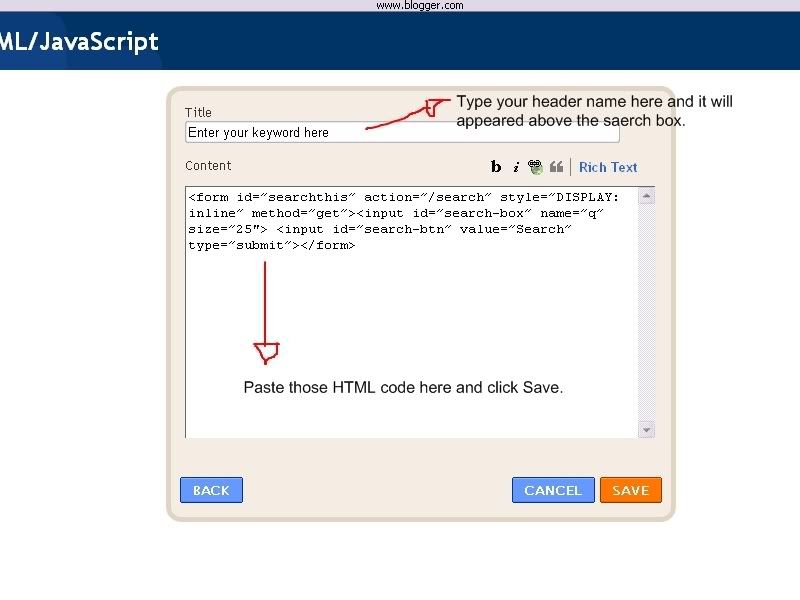
6. Type Search this site (or whatever you want) in the Title box or leave it blank.

7. Copy and paste this HTML code in the text area.

__form id=”searchthis” action=”/search” style=”DISPLAY: inline” method=”get”**__input id=”search-box” name=”q” size=”25″** __input id=”search-btn” value=”Search” type=”submit”**__/form**

Note: Replaced all the "__" with "<" and "**" with ">"

add search


7. Click Save.

8. Click Preview.

9. You may have to drag the search gadget into a new area until you get it positioned where you want it to show on the blog.

10. View your blog to see the result.

Now you have a simple way for your reader to search your blog and the results will appear embedded in your blog. So the reader will not need to read every posts of yours to find what they are looking for.

p/s : Just leave a comment if you had any trouble to make this feature. I will try my best to help. smiling...

December 25, 2008

Backup Your Firefox Settings With MozBackup

There are a couple of good reasons to backup your web browser settings frequently. If you want to install the browser on another computer, you can use that backup to restore your settings, history, and bookmarks. You can choose which settings you want to backup.Let's say, I want to reformat my computer. That mean all the Firefox settings will be gone also. And at the same time, I do not want to lost all the settings. So, this is the time Mozbackup really useful. This little utility also compatible with:  

-Firefox 1.0 - 3.0

-Thunderbird 1.0 - 3.0 Alpha 1

-Sunbird 0.3 - 0.8

-Flock 1.0 - 1.1

-SeaMonkey 1.0a - 1.1

-Mozilla Suite 1.7 - 1.7.x

-Spicebird 0.4

-Netscape 7.x, 9.x

Download this program, and follow the steps.

mozbackup

And remember, backup your settings frequently. By the time you need to restore the data, run MozBackup again and choose to restore the profile. Every single data will be restored to your Mozilla Firefox and you can smile again.

Remember, prevention is better than cure. Have a nice day!

December 18, 2008

How to make Firefox addons work with the newest Firefox

Newest Firefox version has been released and you're keen to try it. But when you install it, you found out that some of the addons wont work anymore.

No worries. You still can make it work.


Step 1 – Downloading the add-on

Locate the add-on you want to install. If it’s on the official Firefox add-on page you’ll have to click “See All version” to be allowed access to the .xpi. Right click on the now clickable “Add to Firefox” button and choose save target file as. 

Step 2 – Extracting the add-on

Locate the add-on you just saved. You should be able to open the .xpi file with your favorite compression utility. Extract the add-on to the folder of your choosing.

Step 3 – Modifying install.rdf 

Open the folder you just extracted the xpi file to. You’ll see a file called install.rdf. Right click and choose "Open with". You can either use notepad or WordPad.

Once you have the document opened do not get intimidated by the amount of text that you see. Search for the word "maxversion".

All you have to do is edit what is between the > <. In this case it says 3.0. Change the number to the current installed version of Firefox. In this case I have Firefox 3.1 Beta 1 installed. Which is written out as 3.1b1. So when I get done, it should say “3.1b1”. 

Once you have that change made, save and exit the file.

Step 4 – Recompressing the xpi file

If you use Winzip, I would recommend you open the folder containing the extracted contents of the xpi file and do a select all. Once all the files are selected, right click anyone of them and click “Add to zip”. When you’re done you should have a file ending in .zip. All that is left is to rename the zip file (in XP you’ll have to make sure you can see file extensions) to the name of the xpi file you downloaded earlier. Just make sure when you are done that the file ends in .xpi and not .zip.

That’s it. Now just open Firefox and drag the xpi file you just created into Firefox and choose install. Reboot Firefox and your add-on should now function properly.

Btw, I'm still using Opera as my default brower! :-p

December 17, 2008

Opening *.docx File

Have you ever received a*.docx file and do not have any idea what it is?

Well, it's actually a MicrosoftWord 2007's file. And its using different extension compared to Microsoft Office 203. 

Example: *.ppt is Microsoft Office PowerPoint 2003 extension and *.pptx is Microsoft Office PowerPoint 2007.

Microsoft probably thought that by making these the default formats, everyone would actually be upgrading to the new version of Office as soon as it was released. But anyway, I'm still using old Office 2003. :-p


How to open those new extension without using new version of Office? Well, take a look at this.

Using OpenOffice:

OpenOffice.org is an open-source, multiplatform and multilingual office suite comparable with MS Office. The best, its FREE! 

Using ZamZar:

Zamzar is an online service to convert files between various formats, docx (and pptx and xlsx) being one of them. The website is free of advertisements and the service speedy. What more can you ask for ? All that Zamzar asks for is your email address to send over a link to the converted document, and of course the original document.

December 12, 2008

Lock Folder Without Using Software

Many people have been asking for an alternative way to lock folders without the use of any software. So, here you go.

1. Open Notepad and copy the below code
2. Change your password in the code (bolded part)
3. Save file as locker.bat .
4. Now double click on locker .bat
5. I t will create folder with Locker automatically for u. After creation of the Locker folder, place the contents u want to lock inside the Locker Folder and run locker.bat again .


************************************************
cls
@ECHO OFF
title Folder Locker
if EXIST "Control Panel.{21EC2020-3AEA-1069-A2DD-08002B30309D}" goto UNLOCK
if NOT EXIST Locker goto MDLOCKER
:CONFIRM
echo Are you sure u want to Lock the folder(Y/N)
set/p "cho=>"
if %cho%==Y goto LOCK
if %cho%==y goto LOCK
if %cho%==n goto END
if %cho%==N goto END
echo Invalid choice.
goto CONFIRM
:LOCK
ren Locker "Control Panel.{21EC2020-3AEA-1069-A2DD-08002B30309D}"
attrib +h +s "Control Panel.{21EC2020-3AEA-1069-A2DD-08002B30309D}"
echo Folder locked
goto End
:UNLOCK
echo Enter password to Unlock folder
set/p "pass=>"
if NOT %pass%== type your password here goto FAIL
attrib -h -s "Control Panel.{21EC2020-3AEA-1069-A2DD-08002B30309D}"
ren "Control Panel.{21EC2020-3AEA-1069-A2DD-08002B30309D}" Locker
echo Folder Unlocked successfully
goto End
:FAIL
echo Invalid password
goto end
:MDLOCKER
md Locker
echo Locker created successfully
goto End
:End

December 10, 2008

Migrate From BitComet To uTorrent?

Tired of BitComet using most of your internet speed?
Thinking of switching to uTorrent that more convenient but at the same time, want to keep your torrent files and let uTorrent complete those files?

That's an easy step.

Remove the selected torrents. (Make sure you remove the tasks only.
Close your BitComet and go to the download folders (where you saved all your downloaded torrents).
What you need to do now is just remove the .bc extensions from incomplete torrent.

Open your incomplete torrent file(s)using uTorrent and make sure you save it to the same folder that you did in BitComet. uTorrent will detect the partial download, do a hash check to see how far along it is, and continue the download.

^Im using BitComet^


^Now Im switching the torrent to uTorrent^


December 5, 2008

How To Create A Secure Ad-Hoc Network?

Want to connect between two or more laptops but did not know how to do it?

You want to play DotA through Local Area Network but did not have any network cable or Internet?

You can do all of that by creatig an ad-hoc connection.

To create an ad-hoc network, follow these simple steps. 

  • Double click on the wireless icon in your system tray. 

  • A new window will appear. Click at the "Properties" button and another window will appear. At the "Wireless Network" tab, choose "Add".

These following steps are based on the numbers in the picture above.

  1. Put your desired name for you ad-hoc connection.
  2. Un-tick this box.
  3. "Network key" and "Confirm network key" will be available after you've done the 2nd step. Put your network key. 
  4. Tick this box.

Click "Ok" after the 4th step. Click "Ok" once again afterward. 

Your ad hoc network is all set up now!!

Double-click at your wireless icon once again and look up for a network connection.

Connect to your ad-hoc connection and key in your password you've in step 3.

Now, ask your friends to connect to your ad-hoc connection. It may take a minute or two to aquire a network address.

Have a great day!

December 4, 2008

How To Delete a Locked File

Try to delete unwanted file(s), but an error message suddenly pop-up saying that file(s) is currently in used, shared or opened?

Have any problem ejecting USB Mass Storage Device? Like this?

So, Unlocker is the best solution! 

This utility is the solution to the following types of Windows error messages :

  1. Cannot delete folder: It is being used by another person or program 
  2. Cannot delete file: Access is denied 
  3. There has been a sharing violation. 
  4. The source or destination file may be in use. 
  5. The file is in use by another program or user.
  6. Make sure the disk is not full or write-protected and that the file is not currently in use 

Download this free,small utility here and install it. 

If any of the error messages appeared, simply right click at the folder or file and select Unlocker.

Example : 


This screen will appear when you click Unlocker and will show what process using the file u want to delete. Choose"Unlock All" and you now can delete that file like normal.

Download Unlocker

Altenative links 1

Alterbative link 2

November 30, 2008

How To Download Videos on Youtube Easily

Ever thinking how to download your favorite videos on YouTube?

Now, i introduced you the DownloadHelper!

Using DownloadHelper, you can easily save videos from most of the popular video sites. Some of the supported sites :
(You can find all the supported sites in here)

Quicklook on DownloadHelper :
  1. It's a Firefox extension to help in downloading media files from the Web. It's able to store on your disk movie files for which the web site does not provide a "Save File" feature. In addition, DownloadHelper can download, in 3 user clicks, all the image and video files linked from a Web page.
  2. it's works on Firefox 1.5, 2.0 and 3.0.

How to install it?
  • Simply go to this site and click at the "Add to Firefox" button.
  • Confirmation box will appear. Click at "Install Now". It will auto-install.
  • You need to restart your Firefox afterward to complete the installation.
You now should see a new icon in your toolbar. You also can change the preference by clicking at the Tools bar in your browser. Not only preference, you can get the list of supported sites, tutorial videos about using it and many more.


Now, go to YouTube and search your video.


Notice that icon has turned into colored one and animated?
Click on it and there's will be a dropdown list of the video.

Click at any video that you wish to download. A dialog box will appear asking you where to save the video. Choose your location and save it.


That's it! I've choose to download the HQ video from the dropdown list. (Do not ask why my connection so slow.)